4 Ingredient Key Lime Pie!

If you’re in a hurry and need a dessert, I highly recommend the recipe on the back of the Nellie and Joe’s key lime juice.  Just 4 ingredients and done in no time.  It’s one of my go-to summer recipes! In the picture above, I made a shortbread crust as an alternative to the traditional graham cracker crust.  Equally as delicious. To order this product just click here Nellie & Joe Key West Lime Juice.

blend all ingredients together, pour into pie shell and bake in preheated 350F oven for 15 minutes. Cool completely and chill before serving.

Homemade Ice Cream

This recipe is for use with an ice cream machine. I have done this recipe in two different machines, one in which you add the traditional ice and salt and the other in which you use a pre-frozen container* both with equally good results. This is a super-easy basic vanilla recipe and can easily be customized by adding your own desired ingredients such as chocolate chips, cookie dough, etc.

Ingredients:

3 cups heavy cream

2 1/4 cups half and half (I have used fat free here as well)

1 1/4 cups sugar

3/4 tbsp vanilla

Combine all the ingredients and stir well until the sugar has dissolved. From here follow the instructions on the machine of your choice. I used the Deni brand, in which you slowly pour the liquid into the machine as it is churning. Ice cream is ready when it is thick and has a soft serve consistency. I then transfer the ice cream to a container for storage in the freezer.

*I have provided links below for various ice cream makers including the Deni brand I used. Just hit to purchase or see details.

Lemon Souffle Cheesecake

With less than 5 ingredients, this dreamy light lemon souffle cheesecake is the perfect treat to welcome long-awaited spring! 

Ingredients:

1 lemon

5 large eggs, at room temperature

8oz cream cheese, at room temperature

14oz sweetened condensed milk

Powdered sugar for dusting, optional

Helpful Equipment: • 8″ Round Springform Pan

Directions: Preheat the oven to 325°F (160°C). You will need at least 2.5-in deep 8-in springform pan. Cut 3.5-inch-wide long strip and 8-inch round circle of parchment paper. Line the sides and the bottom of the springform pan with the prepared parchment paper. Set aside.

Zest and juice the lemon. You should get about 1 teaspoon of lemon zest and 2 tablespoons of lemon juice. Separate the egg whites and yolks. Set aside.

In a mixing bowl with paddle attachment, or using a handheld electric mixer, beat the cream cheese until smooth and fluffy, about 2 minute. Add condensed milk and beat for another minute. Then add the egg yolks and lemon zest with lemon juice. Continue to beat until well combined, 2-3 minutes.

In a separate bowl, beat the egg whites until hard peaks form. Make sure the bowl and the beaters are squeaky clean and free of grease. (Tip: Egg whites at room temperature are easier to beat and reach hard peaks faster.) Fold in half of the whipped egg whites into the cream cheese mixture. Then add the remaining egg whites and gently fold until well-combined and no white streaks are visible.

Transfer the batter into the prepared pan and tap on the counter a few times to release any air bubbles. Place an empty baking sheet on lower rack of the oven and pour about 2 cups of boiling water. Put the cake pan on the middle rack above the rack with water bath. Bake for 45 minutes. Turn off the oven and cool the cake in the oven for 30-40 minutes.

Remove the sides of the springform pan and gently peel off the parchment paper from the sides. Cool completely on the counter, then refrigerate until ready to serve. Before serving, when the cake is chilled and set, gently remove the parchment paper from the bottom and place the cake on a platter. Dust with powdered sugar, if desired. Store the cake in the fridge, covered, for up to 3 days.

All images and text ©Shinee D. for Sweet & Savory by Shinee

Red Velvet Cupcakes with Cream Cheese Frosting

  • 2 1/2 cups sifted cake flour (not all-purpose flour)
  •  1 teaspoon baking powder
  •  1 teaspoon salt
  •  2 tablespoons unsweetened cocoa powder
  • 2 oz. red food coloring (two bottles)
  • 1/2 cup unsalted butter, softened
  • 1 1/2 cups sugar
  • 2 eggs, at room temperature
  • 1 teaspoon vanilla extract
  • 1 cup buttermilk, at room temperature
  • 1 teaspoon white vinegar
  • 1 teaspoon baking soda
  • Cream Cheese Frosting Ingredients:
  • 1 lb (2 blocks) cream cheese (not softened)
  • 1 stick (1/2 cup) butter, at room temperature
  • 1 Tbsp. vanilla extract
  •  4 cups powdered sugar, sifted
  • Directions:   To Make Cupcakes: Preheat oven to 350 degrees. Line 24 muffin tins with cupcake papers. Sift together the cake flour, baking powder, and salt into a medium bowl; set aside. In a small bowl, mix food coloring and cocoa powder to form a thin paste without lumps; set aside. In a large bowl, using a hand mixer or stand mixer, beat butter and sugar together until light and fluffy, about three minutes. Beat in eggs, one at a time, then beat in vanilla and the red cocoa paste, scraping down the bowl with a spatula as you go. Add one third of the flour mixture to the butter mixture, beat well, then beat in half of the buttermilk. Beat in another third of flour mixture, then second half of buttermilk. End with the last third of the flour mixture, beat until well combined, making sure to scrape down the bowl with a spatula. In a small bowl, mix vinegar and baking soda. (Yes, it will fizz!) Add vinegar mixture to the cake batter and stir well to combine. Fill cupcake cups with cake batter until they are about 3/4 full. (I like to use an ice-cream scoop for this!) Bake for approximately 20-22 minutes, rotating pans halfway through. Cupcakes are done when a toothpick inserted in the center comes out clean. Check early and don’t overbake! Cool the cupcakes in their tins on a wire rack for 10 minutes then remove and allow to cool completely before frosting. 
  • Frosting: in the bowl of a stand mixer fitted with the paddle attachment beat the cream cheese and butter on medium-high speed until well combined and smooth, about 2-3 minutes. Mix in the vanilla extract. Gradually beat in the powdered sugar until totally incorporated, increase the speed and then beat until smooth. Frost cooled cupcakes as desired.

recipe adapted from ‘Gimme Some Oven’ blog

Gingerbread “Mug Huggers” Houses

These adorable little gingerbread houses perch on the edge of a mug for a delightful presentation.  I have included a recipe below courtesy of The Food Network, however here is my TIP!  I used a mix from Betty Crocker!  Yup! Just as tasty and super user friendly.  So if you’re a purist, use this recipe otherwise see my link below for the Betty Crocker product. Regardless, I have given instructions on how to create these miniature houses below, as well as my royal icing recipe.  Plus! I included a product link for “cookie cutter shapes” to create these adorable little houses if you don’t feel confident about your creative ability using a cardboard form!

Ingredients for gingerbread

1/2 cup (1 stick) butter, at room temperature

1/2 cup dark brown sugar

1/4 cup light molasses or dark corn syrup

1 tablespoon cinnamon

1 tablespoon ground ginger

1 1/2 teaspoons ground cloves

1 teaspoon baking soda

2 cups all-purpose flour

2 tablespoons water

Directions

    1. Gingerbread House: In a large mixing bowl, cream the butter, brown sugar, molasses, cinnamon, ginger, cloves and baking soda together until the mixture is smooth. Blend in the flour and water to make a stiff dough. Chill at least 30 minutes or until firm.


  1. Preheat oven to 375 degrees F.

Here is where my directions apply (whether using a mix or the above recipe)

Royal Icing

3 egg whites

1/2 tsp. cream of tartar

4 3/4 cup confectioners sugar

Beat the egg whites with the cream of tartar until frothy.  Add the sugar in smaller amounts and incorporate well.  Beat on high for about 4 minutes until thickened.  Use immediately or cover with a damp paper towel and plastic wrap to avoid drying out.

Fill a pastry bag with a small decoration tip attached.


Make cardboard templates for the front, sides and roof.  Try to stay in the 1 – 1 1/2″ range.


Roll out the dough on a floured surface.  Using the templates, determine approx. how many houses to make, cut out fronts, sides and roof pieces using a pizza wheel.  Transfer to a baking sheet with a silpat liner and bake until slightly firm, about 10 minutes.  Remove to wire racks to cool.

With the royal icing, attach the sides one at a time to the front piece of the house, then attach the back.  Proceed to the next so as to allow the icing to harden.  Now attach the roof pieces one side at a time.

Again, allow to dry before adding the other section.  This should all go rather quickly as the icing sets up fast.  Allow to dry a bit before proceeding to decorate.  Embellish as you desire!

These little houses also make great party favors or gifts.  Place in a cellophane bag, add a cute ribbon and there you have it!

Busy Day Dessert

This is a little shortcut that is perfect for those days when you’d like to serve a dessert, but really don’t have the time to be mixing from scratch.  It’s quick and with a few supplies from the pantry, you can make something ordinary into something exceptional!

I took a “Mug Cake” package.  Greased the inside of a taller shaped mug (to get more height) and baked according to the directions on the package.  When slightly cooled, I turned it out to cool.  Then I gently sliced the cake in half.  Frosted the half with the frosting much like a layer cake except a little more generous.  Placed the top half on and spread some more frosting on the top.  Sprinkled on some chocolate chips and a light dusting of confectioners sugar.

These make great little cakes for individual desserts.  Try piping on the frosting for a more decorative look.  Colored sprinkles or chocolate jimmies, etc.  The possibilities are endless.

My Favorite Sugar Cookie Recipe!

I’ve been making these cookies for years.  The dough is just perfect, not too sweet and great for cut-outs!

3/4 cup shortening (part butter or margarine)

1 cup sugar

2 eggs

1 tsp. vanilla extract

2 1/2 cups all purpose flour

1 tsp. baking powder

1 tsp. salt

Mix shortening, sugar, eggs and vanilla thoroughly.  In a separate bowl, combine the flour, baking powder and salt.  Gradually add the flour to the shortening mixture.  Combine into a ball, wrap in plastic wrap and chill at least one hour.  Heat oven to 400F.  Roll out dough approx. 1/8″ thick on a lightly floured surface.  Cut with cookie cutters.  Place on ungreased cookie sheets and bake 6 – 8 minutes or until a delicate golden color.  Let stand for a minute.  Remove and place on wire racks to cool completely.  Makes about 4 dozen depending on the size of your cookie cutters.

TIP – I highly recommend the silpat mats in the links below.  They help cookies to bake more evenly and they will virtually slide off when baked!

Apple-Cream Cheese Bundt Cake with Brown Sugar Glaze

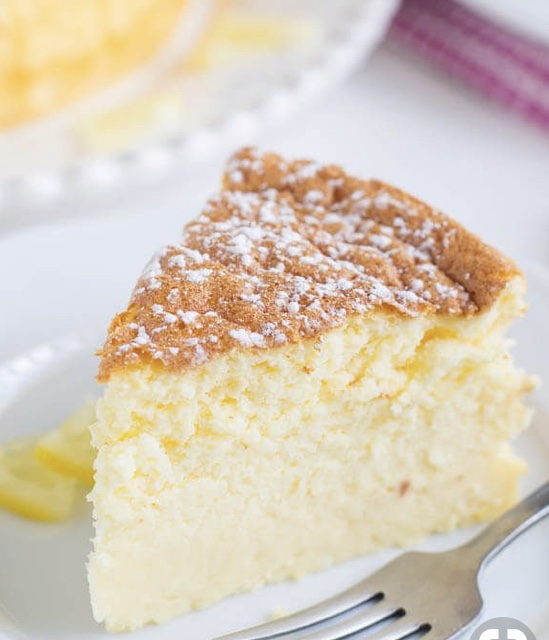
I found this recipe in Southern Living Magazine.  I had to share it here, a true fall favorite!

Swirl:

1 8-ounce pkg cream cheese, softened

1/2 cup confectioners’ sugar

2 tbsp. flour

1 large egg

1 tsp. vanilla extract

Cake:

1 1/2 cups unsalted butter, softened

1 3/4 cups sugar

1 tbsp. vanilla extract

3 large eggs

1/4 cup whole milk

3 cups all-purpose flour

1 tbsp. apple pie spice

1/2 tsp. salt

1/2 tsp. baking powder

1/2 tsp. baking soda

2 cups diced peeled apples (about 2 apples)

1/2 cup chopped pecans

Glaze:

1/2 cup firmly packed light brown sugar

3 tbsp. water

2 tbsp. unsalted butter

1 tbsp. dark corn syrup

1 3/4 cups confectioners’ sugar

Garnish of chopped pecans if desired

Preheat oven to 325F. Spray a bundt pan with baking spray and lightly flour.

For swirl – in a medium bowl, beat cream cheese with a mixer at medium speed until creamy.  Add confectioners’ sugar, flour, egg and vanilla and beat until smooth.  Scrape sides of bowl and beat another minute.  Cover and refrigerate.

For cake – In a large bowl, beat butter, sugar and vanilla with mixer on medium speed until fluffy, 3-4 minutes.  Add eggs, one at a time, beating well after each addition.  Add milk, beating just until combined.  In a medium bowl, mix together flour, apple pie spice, salt, baking powder and baking soda.  With mixer on low speed, gradually add flour mixture to butter mixture, beating until combined.  Fold in apples and pecans. Batter will be thick.  Spoon half of batter into prepared pan, spoon swirl mixture on top of better, avoiding edges of pan.  Top with remaining batter. Using a knife, pull blade back and forth through batter to swirl layers together, smooth top of batter.  Bake until a wooden pick inserted near center comes out clean about 1 hour and 20 minutes.  Let cool in pan, remove and let cool completely on a wire rack.

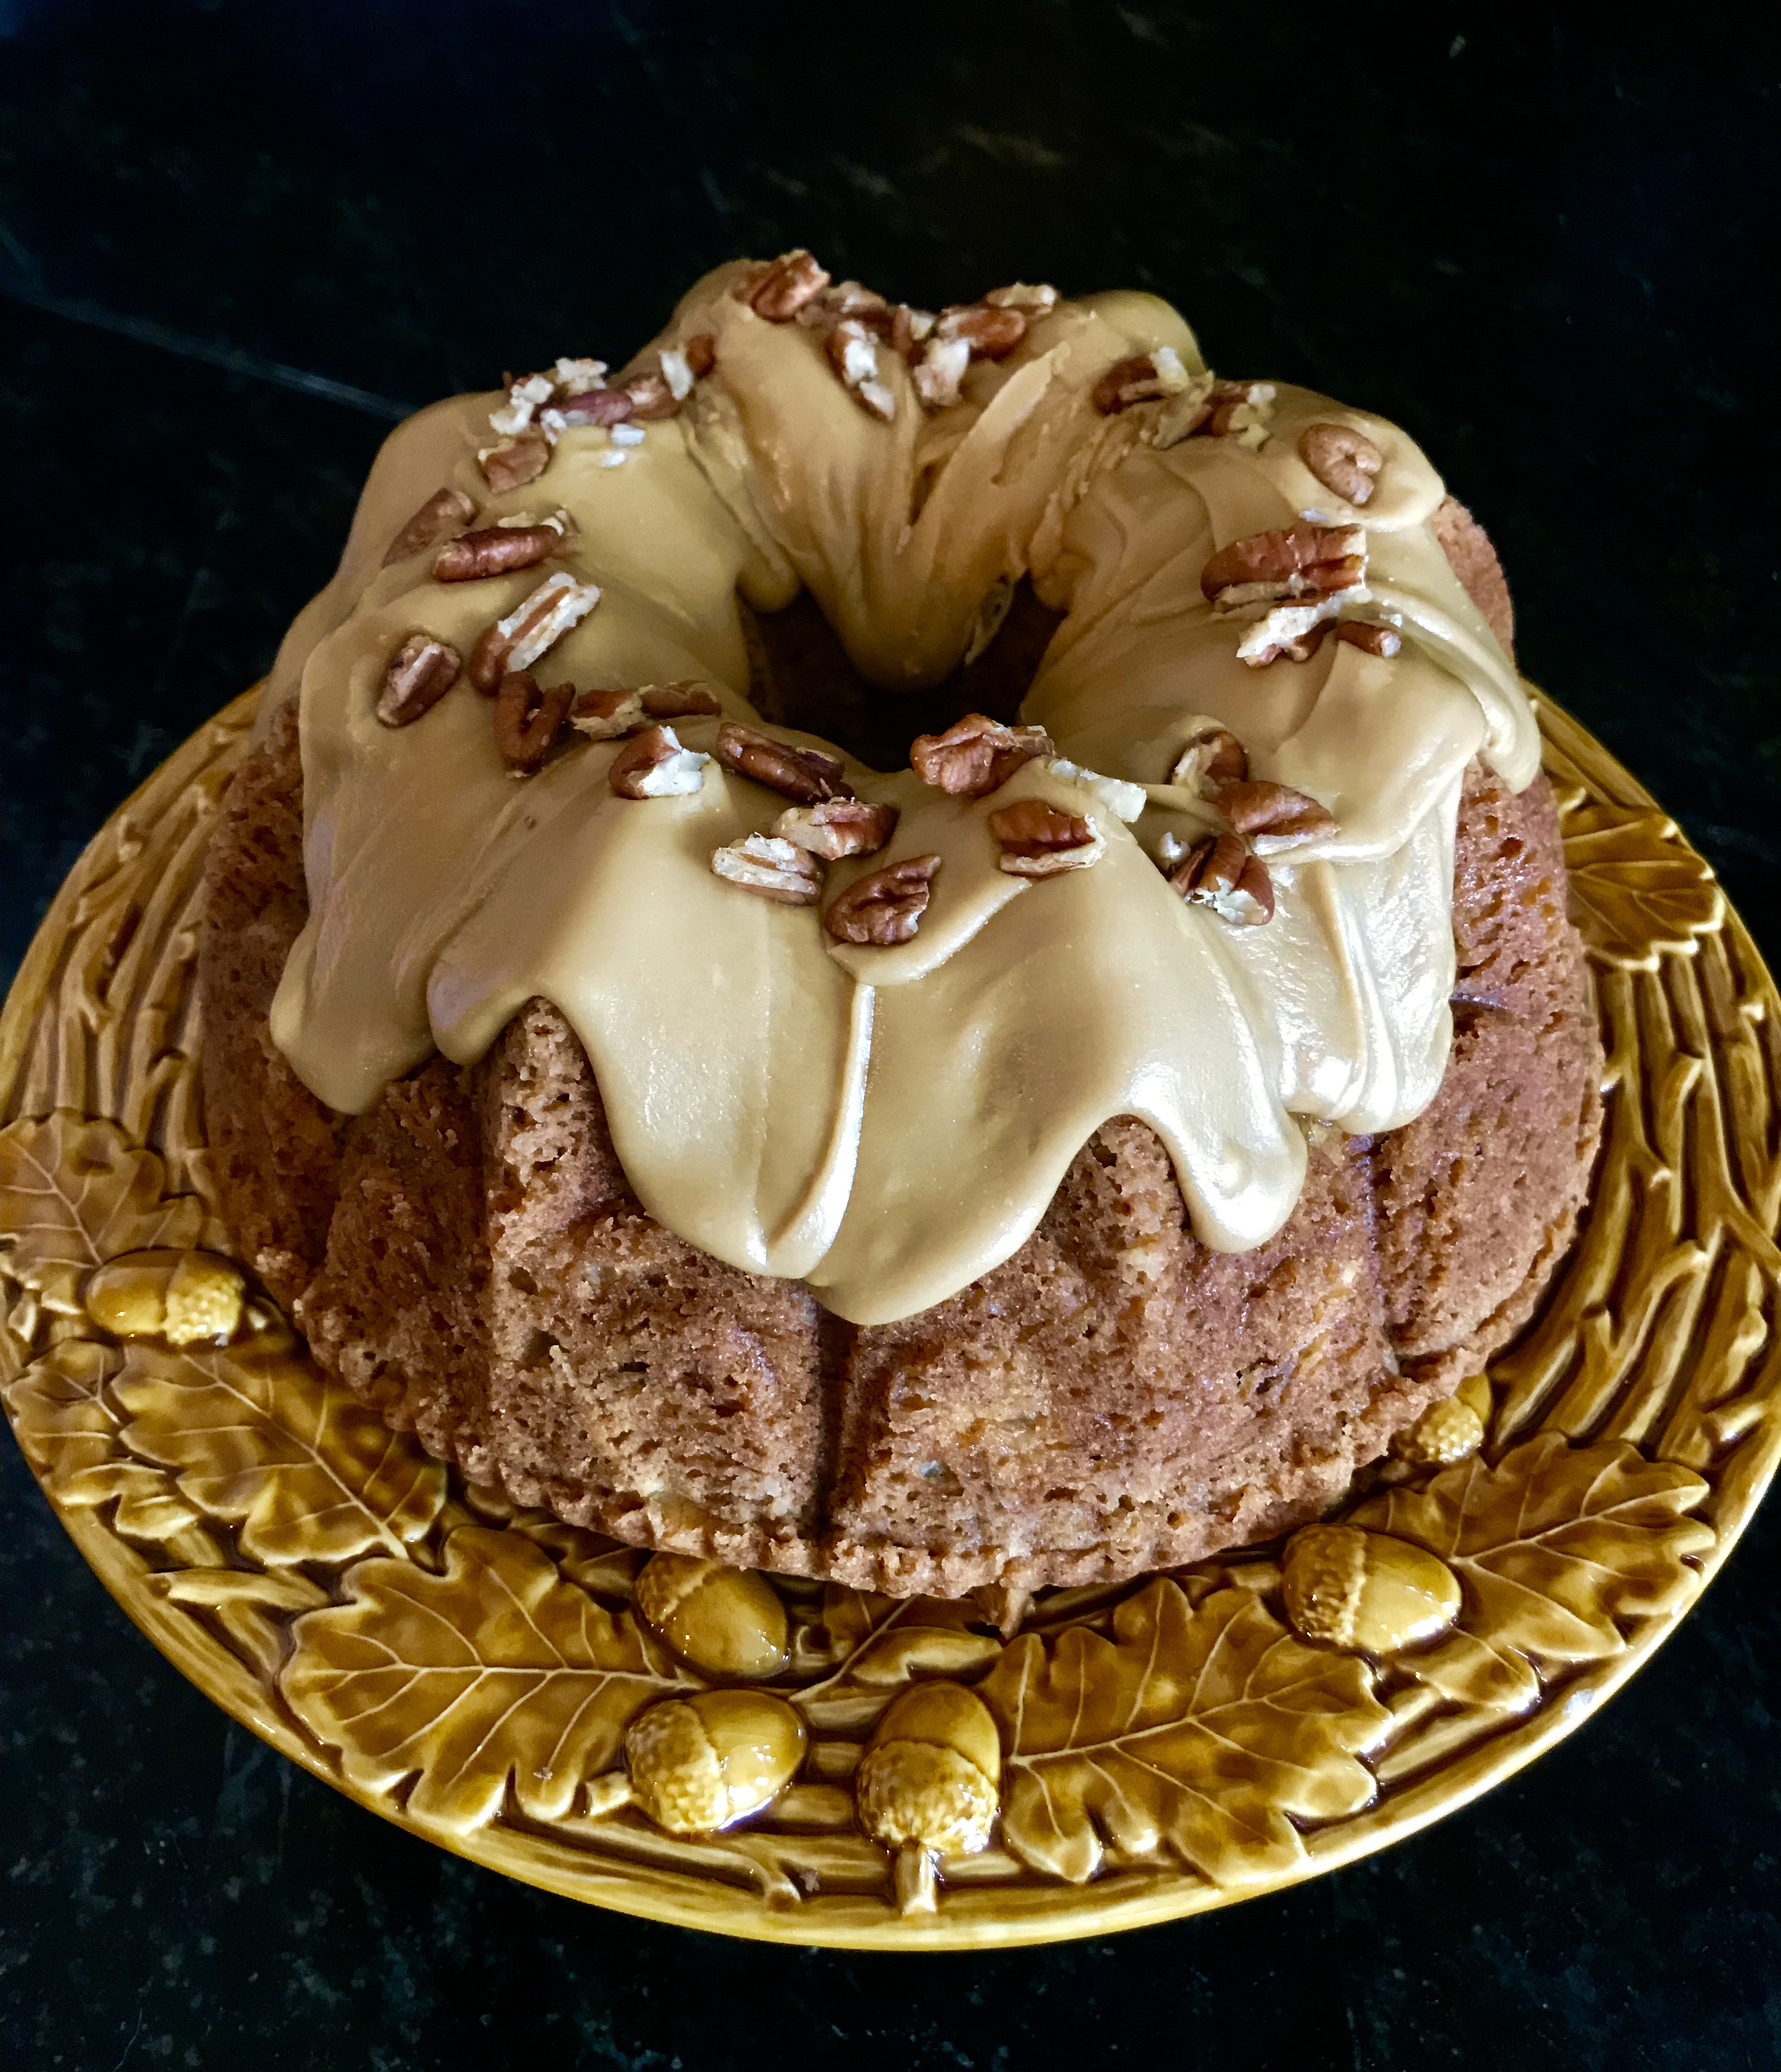
For glaze – In a small saucepan, bring brown sugar, water, butter and corn syrup to boil over medium-high heat. Reduce heat to medium-low and cook for 1 minute.  Remove from heat.  Add confectioners sugar and whisk for a minute. Let cool for a few minutes before drizzling over cake .  Garnish with pecans.


Dutch Apple Pie

Yes, that is an aluminum pie tin you see.  This recipe uses a frozen pre-made crust.  Of course, you can always make your own from scratch if you prefer, but this recipe is all about ease without a bit of compensating on flavor!

1 frozen pie crust (keep chilled)

5-6 tart apples, we used Cortland’s here

1/3 cup sugar

1 tsp. cinnamon

1/4 tsp. ground nutmeg

2 tbsp. flour

For topping:

1 jiffy brand pie crust mix

1/2 tsp. cinnamon

1/4 cup packed brown sugar

3-4 tbsp. very cold water

Preheat oven to 375F. Peel and core the apples and slice approx. 1/4″ thick. (Look for the apple peeler in links below – I swear by this little gadget!) Place in a large bowl and toss with the sugar, cinnamon, nutmeg and the flour.  Mix thoroughly.  Arrange the apples in the slightly thawed pie shell, being sure to heap slightly in the center.  You may have some extras, just put aside.  For the topping, mix the pie crust mix, cinnamon and brown sugar thoroughly.  Add the water a tablespoon at a time tossing lightly with a fork until the dough starts to form large and medium sized clumps.  There will still be some ‘loose’ dough as well.  Place the pie on a baking sheet, heap the crumble topping on the pie to coat.  Bake for approx. 45 minutes or until topping is golden.

Concord Grape Pie

This truly is a specialty to the upstate NY finger lakes region.  Concord grapes grow abundantly here because of the ideal conditions of the hillside climates alongside the lakes.  I found this recipe from an upstate blogger, Jennifer Morrisey of Home in the Finger Lakes.  Instead of a two crust pie, I made my upper crust a crumb topping.  Here is her recipe…….

Concord Grape Pie

  • Author: Jennifer
  • Prep Time: 1 hour 30 minutes
  • Cook Time: 1 hour
  • Total Time: 2 hours 30 minutes
  • Yield: 8

Ingredients

  • 1 recipe or your favorite double crust pie dough prepared
  • 1 1/2 lbs of Concord grapes (after removing from stems)
  • 3/4 cup + 2 tbsp (6.0 oz) sugar
  • 2 1/2 tbsp cornstarch
  • 1 1/2 tbsp freshly squeezed lemon juice
  • 1 tbsp unsalted butter, softened

Instructions

  1. On a lightly floured work surface, roll 1 half of a double crust pie dough into a 15-inch round. Fit dough into a 9-inch pie plate, pressing it into the edges. Trim to a 1-inch overhang all around. Cover with plastic wrap; chill pie shell until firm, about 30 minutes. Repeat process for rolling out dough for the top crust. Transfer to a baking sheet, cover with plastic wrap, and refrigerate until you are ready to assemble the pie.
  2. Wash grapes and discard any that are under-ripe, damaged and blemished.
  3. Remove the skins from the grapes by pressing them between your thumb and forefinger. Put the skinless grapes in a medium saucepan. Reserve the skins in a small bowl.
  4. Gently mash the grape pulp in the medium saucepan to release their juice. Cook over medium low heat until grapes come to a full boil, and simmer, covered, for 5 minutes.
  5. Remove from heat and allow to cool completely. Press the grapes through a fine sieve and discard the pits.
  6. In a heavy bottomed pot: combine the grape pulp, grape peels and all the remaining ingredients . (You’ll have about 1 1/3 cups of pulp – add everything else and you’ll have about 2 cups) Bring to a simmer over low heat, stirring continually until the filling is slightly thickened and bubbly. Remove from heat and allow to cool completely.
  7. Preheat the oven to 400°F with a rack in the bottom third of the oven with a pizza stone or baking sheet on it.
  8. Transfer the cooked filling to the prepared pie shell. Moisten the edges of the pie crust with water and attach the top crust, crimping the edges to seal the crust.
  9. Cut six small slits in the crust to act as vents. Place pie on the pizza stone, protect the edges with a pie ring, and bake for 30 minutes at 400° F and then reduce heat to 375° F and bake an additional 25-30 minutes until the filling is bubbling. Cool on a wire rack for at least 3 hours before cutting.